Sunday, February 28, 2016

Craft of The Day From Ave 21 Marketplace "How to make a Fake Faux Cake"

Make and Sell Fake Cakes


Materials: 2 Styrofoam Disc, Acrylic Caulk Your Choice of Color or white and use a few drops of paint to color, (4 Tubes), Acrylic Paints, Glue (3M Fastbond Contact Adhesive.)

Tools: Spatula, Disposable Pastry Bags, Decorator Tips 32, 104, 4, and 352, Lazy Susan/ Cake Decorating Turntable (Optional)

First, a word about tools. Cake decorating is a perfect example of a project which uses real food preparation tools with non edible chemicals. Always be sure to store food safe tools/containers separately from non food safe tools, and label them well. If you are storing actual, food-safe, prep supplies in the shop, make sure they are stored in closed containers to protect them from contamination. Remember, once a tool or utensil is used once on something that is not food-safe, it is no longer to be used for edible food preparation. 

Styrofoam is a really good base for fake cakes, it is lightweight, easily shaped, and fairly durable. Best of all, it doesn't crumble so it is easy to frost. For this cake, I used 2 styrofoam, first then gluing the two layers together glue. Before frosting, I rounded the top edge slightly with sandpaper.

The frosting is white acrylic caulk. The caulk is easy to work with, can be colored by adding acrylic paint, and can be smoothed with water when wet. When dry, it is paintable, durable, and somewhat flexible. When frosting a cake, you want to start with a big blob of frosting on top, and spread it outwards with even strokes of your spatula. If you need to add more frosting, add it to the center blob, and work it into the frosting that is already down.  


When you get to the edges, let the frosting fall down the sides of the cake before smoothing it down. To get the sides straight and smooth, hold your spatula upright, at a 45 Degree angle to the cakes edge and, in one continuous motion, gently smooth the frosting around the cake.This is where the Lazy Susan really comes in handy. Being able to turn the cake while you smooth is a big help.

Like real butter cream frosting, acrylic caulk can be smoothed with water for a nice, finished look.
Wet your spatula lightly, and smooth over any folds or lines. Keep the blade of your spatula clean by wiping it often with a damp rag. No frosted cake is as smooth as glass, so some imperfections will give it a realistic look.


Once the layer of frosting is complete, you can start piping. For this cake, I used a simple shell border on the top and bottom of the cake. 
 
  
 The hole in the middle is for a fake candle ( Not a must you can skip that part) 

For a Cake Like MOM MADE Simply frost your cake just like you would if it was real with the caulking. 
Let dry for at least 24 hours or till totally dry.


REMEMBER! 

Ave 21 Marketplace will wave the 3.5% fee to the First 50 Sellers for as long as you stay with us!

Yes you still have to do the Paypal Pre Approval process, since All sellers have their own shopping cart. So remember to do the GET PAID & BILLING part of your store admin. This needs to be done every 90 days.

There is "Never" a listing fee on Ave 21 Marketplace and you can list as many items as you want always.

Open Your New Store Today!

We are No Longer going to allow certain items. All items must be Handmade or Vintage


Ave 21 Marketplace www.ave21.com is a online marketplace where people can buy and sell Handmade Goods, Fine Art, Vintage Items and Crafting Supplies, and participate in an online artisan community. 

Ave 21 Marketplace is completely about celebrating the fact that the world is full of creative flair. There are literally millions of artisans around the world brimming with artistic talent. When that creativity is expressed through art the world is a richer place because of it. This is what we firmly believe at Ave 21 Marketplace. Our passion is to champion the cause of promoting artisans and their works to the world so that everyone is more inspired because of it.

We encourage you to be involved in every aspect of Ave 21 Marketplace - display your work, give feedback, write reviews, participate in forums, team up with other members to collaborate on projects, talk to each other and keep an eye out for new services we will continue to add.

String Easter Egg Shaped Baskets Craft of The Day


I used to make these for my children ( Now in their 40s ) every year. Also sell them at Craft Fairs, this was before we had computers. 
So it’s time to break out the glue gun and get crafty!
Supplies:
Crochet thread (I purchased 1,000 yards for two balloons and it was way too much)
Fabric stiffener such as Stiffy
Bowl
Plastic wrap
Tape
Disposable bowl or cupcake tray
Balloon
1/4 Yard coordinating fabric
Weighty filler such as beans or rice
Glue Gun
Ribbon
Scissors
Sewing Machine - If you can't sew or don't have a machine you can hot glue these together or just use a zip lock bag
Let’s get started! First prepare your work area. Line your bowl with the plastic wrap. As I discovered (after I had glue all over the place) you might want to tape down the edges of that plastic wrap to the bowl. If you care about the table you’re working on, you’ll need to cover that too. I find that a trash bag works perfectly.
Now give your lungs a small workout and inflate a balloon. Remember, you’re going for an egg shape so don’t over inflate.
Drop your string into your prepared bowl and give it a bath in Stiffy. You want to make sure the string is saturated,but not in a pool of Stiffy otherwise you’ll be flinging that stuff all over your kitchen as you make your egg.
Wrap the end of the string around the top of the balloon to get started. This will hold that first piece of slippery string in place until you can get enough in place that it will hold itself.
Continue wrapping your egg until you’ve got complete coverage. This basket took me about a half hour. You’ll want to add more Stiffy along the way when you get to string that isn’t saturated.
With your masterpiece complete,set the egg in a bowl or cupcake try to dry for 24 hours.  Half way through the drying process,turn your egg on its side so the bottom can dry thoroughly.
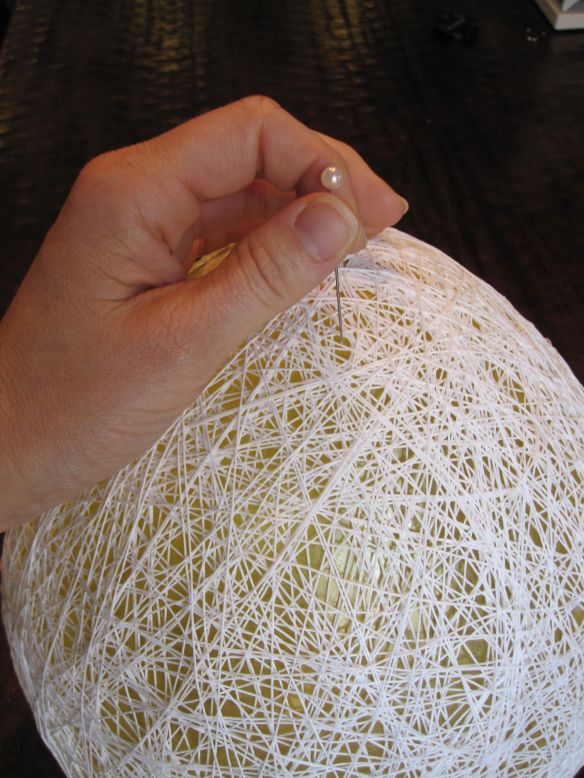
After the egg has had plenty of drying time, break out your pin and pop the balloon inside.
If you can, pull the top out, but don’t force it, you’ll have plenty of chance to get it out later.
Leave the sad, deflated balloon inside, we’ll grab him when we cut open the basket.
So the fundamental problem with making an egg shaped basket is that eggs don’t stand up on their own
When my neighbor made these she would put them in a silver disposable bowl and try to dress it up, but I just never really liked that. So I thought about it a bit and decided to put a weight in the bottom to see if it would stand the basket up – just like those weighted inflatable punching dummies we had when we were kids. Don’t tell me you didn’t ever smack one of those and have it rebound right in your face! So I grabbed a plate from my cupboard to use as a circle pattern. Of course the size you need is going to vary depending on how how large your egg is, but for reference this plate is 8″ in diameter and I used a 5/8″ seam allowance.
No-Sew Cheater Alert: I bet you could just grab a zip-loc bag, throw some rice or beans in there and cover it up with lots of grass if you don’t have a sewing machine at home.
Sew two circles together leaving an opening for filling.
Clip the curves to take out bulk and turn the disk right side out.
Fill your weight to the desired fullness. You can use rice, beans, or whatever you have around for filling.  
Once you’ve completed operation fill, hand sew the opening of the weight closed.
Now you’re going to cut into that egg. There is no correct way to do this, but I will say, start small. You can always make the opening bigger, but you can’t make it smaller!
Here’s what I came up with, not perfectly circular. Now is your chance to grab that balloon that was sitting in the basket.
Place the weight in the egg 
It’s time to break out the glue gun and get crafty!  I like to line the edges of the opening with ribbon to reinforce and decorate the edge.

Remember!
Ave 21 Marketplace will wave the 3.5% fee to the First 50 Sellers for as long as you stay with us!

Yes you still have to do the Paypal Pre Approval process, since All sellers have their own shopping cart. So remember to do the GET PAID & BILLING part of your store admin. This needs to be done every 90 days.

There is "Never" a listing fee on Ave 21 Marketplace and you can list as many items as you want always.

Open Your New Store Today!

We are No Longer going to allow certain items. All Items MUST BE HANDMADE or VINTAGE

Ave 21 Marketplace www.ave21.com is a online marketplace where people can buy and sell Handmade Goods, Fine Art, Vintage Items and Crafting Supplies, and participate in an online artisan community. 

Ave 21 Marketplace is completely about celebrating the fact that the world is full of creative flair. There are literally millions of artisans around the world brimming with artistic talent. When that creativity is expressed through art the world is a richer place because of it. This is what we firmly believe at Ave 21 Marketplace. Our passion is to champion the cause of promoting artisans and their works to the world so that everyone is more inspired because of it.
We encourage you to be involved in every aspect of Ave 21 Marketplace - display your work, give feedback, write reviews, participate in forums, team up with other members to collaborate on projects, talk to each other and keep an eye out for new services we will continue to add.

http://ave21.com

Saturday, February 27, 2016

Leap Day Traditions


Betcha didn't know:
Leap Day, on February 29, has been a day of traditions, folklore and superstitions ever since Leap Years were first introduced by Julius Caesar over 2000 years ago.

Women Propose to Their Men:
According to an old Irish legend, or possibly history, St Brigid struck a deal with St Patrick to allow women to propose to men – and not just the other way around – every four years.
In some places, leap day has been known as “Bachelors’ Day” for the same reason. A man was expected to pay a penalty, such as a gown or money, if he refused a marriage proposal from a woman on Leap Day.
In many European countries, especially in the upper classes of society, tradition dictates that any man who refuses a woman's proposal on February 29 has to buy her 12 pairs of gloves. The intention is that the woman can wear the gloves to hide the embarrassment of not having an engagement ring. During the middle ages there were laws governing this tradition.

Ave 21 Marketplace will wave the 3.5% fee to the First 50 Sellers for as long as you stay with us!

Yes you still have to do the Paypal Pre Approval process, since All sellers have their own shopping cart. So remember to do the GET PAID & BILLING part of your store admin. This needs to be done every 90 days.

There is "Never" a listing fee on Ave 21 Marketplace and you can list as many items as you want always.

Open Your New Store Today!

We are No Longer going to allow certain items. All Listing Must Be handmade or Vintage

Ave 21 Marketplace www.ave21.com is a online marketplace where people can buy and sell Handmade Goods, Fine Art, Vintage Items and Crafting Supplies, and participate in an online artisan community. 

Please Read Our Terms & Privacy Policy.

Ave 21 Marketplace is completely about celebrating the fact that the world is full of creative flair. There are literally millions of artisans around the world brimming with artistic talent. When that creativity is expressed through art the world is a richer place because of it. This is what we firmly believe at Ave 21 Marketplace. Our passion is to champion the cause of promoting artisans and their works to the world so that everyone is more inspired because of it.
We encourage you to be involved in every aspect of Ave 21 Marketplace - display your work, give feedback, write reviews, participate in forums, team up with other members to collaborate on projects, talk to each other and keep an eye out for new services we will continue to add.

The Egg in Art suggesting Luck, Wealth and Health

Copy by Cesare da Sesto (1505-10) of  Leonardo da Vinci's  “Leda and the Swan"  also called “the lost painting.” is one of history’s great art losses.  The original of this is lost, probably deliberately destroyed, and was last recorded in the French royal Château de Fontainebleau in 1625.
Copy by Cesare da Sesto (1505-10) of Leonardo da Vinci’s “Leda and the Swan” also called “the lost painting.” The original is one of history’s great art losses, probably intentionally destroyed, and was last recorded in the French royal Château de Fontainebleau in 1625.


http://ave21.com/

The dominant symbol for the mystery of original creation is the egg.  Throughout the world, the egg is a propitious symbol, suggesting luck, wealth and health. Magical eggs of gold or silver are guarded by dragons; and from eggs gods and heroes are born.  In one story, Helen of Troy came from an egg that had fallen from the moon. Alternatively she was born from an egg laid by Leda, queen of Sparta, after she had coupled with a swan (the god Zeus in disguise.) Later that night Leda also slept with her mortal husband. She laid two eggs; from on came Polydeuces and Helen, and from the other Castor and Clytemnestra. Also associated with the promise and hope of spring, the egg took a ready-made place in Christian Easter ceremonies as a symbol of resurrection.  Eucharistic implications are suggested by the tradition of eating eggs at the end of Lent. In Jewish custom, at the Seder meal the egg is a symbol of promise and traditionally it is the first food offered to Jewish mourners.
Piero della Francesca’s altarpiece  "Madonna and Child with Saints" (1472-74) Note the  large ostrich egg hanging from the shell in the apse above the Madonna
Piero della Francesca’s altarpiece “Madonna and Child with Saints” (c. 1450) Note the large ostrich egg hanging from the shell in the apse above the Madonna
A curious old folkloric notion that Ostrich eggs hatch themselves is connected to the use in art of an egg to symbolize the Immaculate Conception – as in Piero della Francesca’s altarpiece Madonna and Child with Saints (c. 1450);  ostrich eggs also feature as symbols of resurrection on tombs found in Coptic churches.  In many myths, ranging from Egypt and India to the Far East and Oceanic, the initial process of creation and birth begins when a cosmic egg (sometimes fertilized by a serpent but more often laid in the primeval sea by a giant bird) gives form to chaos, and from it hatches the sun (the golden yolk) leading to the division of earth and sky and the multiplicity of life, natural and supernatural.  The creation symbolism of the egg is strengthened by the egg shape of the testicles and by the sexual duality of the egg’s yolk and white:  in the Congo, the yolk stands for female warmth, while the white symbolizes male sperm.
The ancient Native American archaeological site in Adams County, Ohio called the “Great Serpent Mound” features a snake’s body with a coiled tail similar to that of the Kundalinilying dormant in the sacrum. In its mouth appears an egg, symbol of the potential actualization of Second Birth.  Is it possible, that the ancient Native American people were more than aware of the Divine Feminine as well as the symbolic, spiritual significance of the Serpent Power and the Primordial Egg?

Craft of The Day Easy Beautiful Men's Silk Tie Dyed Eggs


Men's Silk Tie Dyed EGGS
Anyone Can Make and Sell
 
Dyeing eggs with silk ties – an idea picked up from Martha Stewart Show. 
If you haven’t seen the original video, you should.
The end result is a swirling dervish of sparkly pastel eggs & Cheap Cheap Cheap! This is an easy project that relies on little more than bundling and soaking — both are very kid friendly, especially if you use hard boiled eggs instead of fragile, hollow eggs. Of course, I would avoid eating eggs that have been boiled in garment dye but I wouldn’t think twice about setting them out on the coffee table.

Materials
  • Eggs with their inside blown out (see this video)
  • Silk neckties (can also use scarves or fabric scraps – must be 100% silk)
  • Tissue paper cut into long strips (dark colors work best) - Optional 
  • Non-metal pot (I used my slow cooker, but you can find ceramic and glass pots at the thrift store – no metal)
  • Vinegar
  • Coffee filters
  • Dental floss or strong white thread/twine
  • Mod Podge
  • Gold Paint Pen - Optional -  If You want to add this part. Looks just as beautiful without

  • Again: watch the original video. That way you can skip most of these directions. Or piece it together from the pictures. I love craft tutorials with more pictures than words, don’t you? .
The number of eggs will determine how many neckties you need, but I would estimate 4-6 eggs per tie ( ties from thrift store for 50cents each. Not all neckties have obvious fabric indication tags, but if a tie is 100% silk, there is a decent chance the manufacturer will brag about it with a big ol’ tag). 
Cut the tie apart into pieces large enough to surround each egg, roughly 5″ square or larger.

OPTIONAL - Tissue Paper
The dying process is based on a simple bundling technique.
Egg > Tissue Strip > Silk Piece > Coffee Filter > Tied Together with Floss
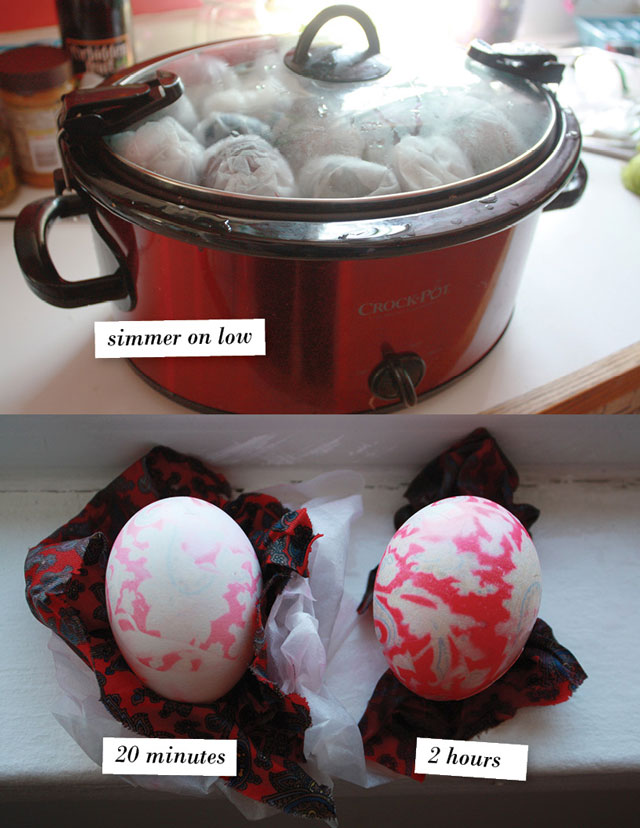
Use tongs to submerge the egg bundles in hot water (not boiling) with a splash of vinegar. Leave them there to soak. Be sure to use a non-metallic pot, as it will react with the acidity of the vinegar and effect the dye process. I don’t know about you, but I don’t have any non-metallic pots sitting around so I resorted to using my slow cooker with a ceramic insert. The slow cooker also allowed for a clamp-on lid, which was helpful in keeping the eggs wet, even if they insisted on floating (fully submerging eggs in a crowded pot isn’t easy).
You will have to experiment to see how long they stay in there. Some dyes will release in a few minutes, some will take a few hours.
As you can see, the paisley print was a direct transfer in some spots, while the strip of green tissue created reverse-print stripes in other spots. The overall effect is very muted and pretty. And abstract. Which is a nice way of saying no one will notice if you make a mistake. Don’t you love that?
It’s important to coat the outside and the inside with diluted Mod Podge. You can also added a dash of glitter to the mix. 

OPTIONAL - GOLD MARKER 
Now for the fun! Use the ‘stripe’ created by the tissue paper as a guide on where to use your gold paint pen. Again Tissue and Marker part is Optional.