Men's Silk Tie Dyed EGGS
Anyone Can Make and Sell
Dyeing eggs with silk ties – an idea picked up from Martha Stewart Show.
If you haven’t seen the original video, you should.
The end result is a swirling dervish of sparkly pastel eggs & Cheap Cheap Cheap! This is an easy project that relies on little more than bundling and soaking — both are very kid friendly, especially if you use hard boiled eggs instead of fragile, hollow eggs. Of course, I would avoid eating eggs that have been boiled in garment dye but I wouldn’t think twice about setting them out on the coffee table.
- Eggs with their inside blown out (see this video)
- Silk neckties (can also use scarves or fabric scraps – must be 100% silk)
- Tissue paper cut into long strips (dark colors work best) - Optional
- Non-metal pot (I used my slow cooker, but you can find ceramic and glass pots at the thrift store – no metal)
- Vinegar
- Coffee filters
- Dental floss or strong white thread/twine
- Mod Podge
- Gold Paint Pen - Optional - If You want to add this part. Looks just as beautiful without
- Again: watch the original video. That way you can skip most of these directions. Or piece it together from the pictures. I love craft tutorials with more pictures than words, don’t you? .
The number of eggs will determine how many neckties you need, but I would estimate 4-6 eggs per tie ( ties from thrift store for 50cents each. Not all neckties have obvious fabric indication tags, but if a tie is 100% silk, there is a decent chance the manufacturer will brag about it with a big ol’ tag).
Cut the tie apart into pieces large enough to surround each egg, roughly 5″ square or larger.
The dying process is based on a simple bundling technique.
Egg > Tissue Strip > Silk Piece > Coffee Filter > Tied Together with Floss
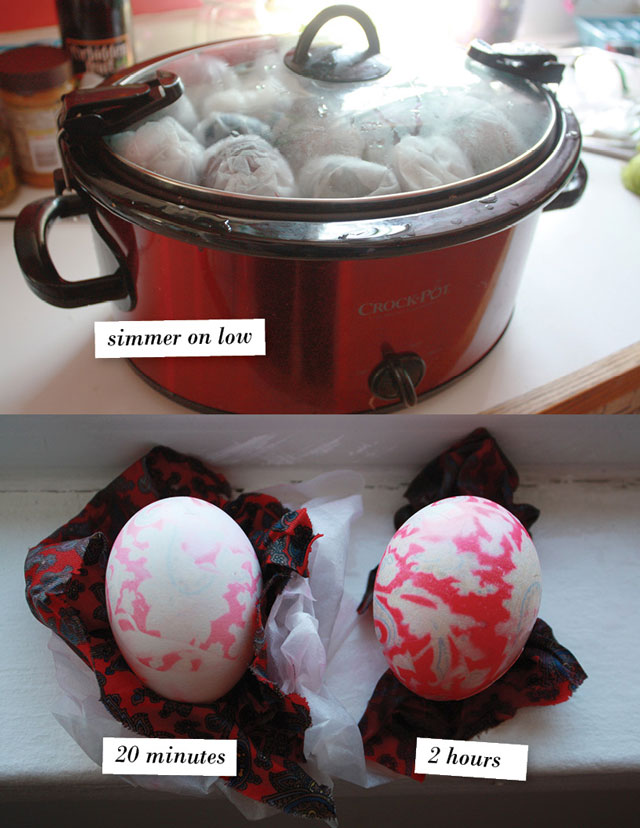
Use tongs to submerge the egg bundles in hot water (not boiling) with a splash of vinegar. Leave them there to soak. Be sure to use a non-metallic pot, as it will react with the acidity of the vinegar and effect the dye process. I don’t know about you, but I don’t have any non-metallic pots sitting around so I resorted to using my slow cooker with a ceramic insert. The slow cooker also allowed for a clamp-on lid, which was helpful in keeping the eggs wet, even if they insisted on floating (fully submerging eggs in a crowded pot isn’t easy).
You will have to experiment to see how long they stay in there. Some dyes will release in a few minutes, some will take a few hours.
As you can see, the paisley print was a direct transfer in some spots, while the strip of green tissue created reverse-print stripes in other spots. The overall effect is very muted and pretty. And abstract. Which is a nice way of saying no one will notice if you make a mistake. Don’t you love that?
It’s important to coat the outside and the inside with diluted Mod Podge. You can also added a dash of glitter to the mix.
Now for the fun! Use the ‘stripe’ created by the tissue paper as a guide on where to use your gold paint pen. Again Tissue and Marker part is Optional.


No comments:
Post a Comment